How to Repair Car Windows, Windshield Cracks, and Auto Glass Maintenance
How to Repair Car Windows, Windshield Cracks, and Auto Glass Maintenance
How to Repair Car Windows, Windshield Cracks, and Auto Glass Maintenance
Replace your windshield as soon as next day at your home, work or your preferred location.
By submitting this form you are agreeing to receive SMS and phone call updates on your windshield replacement and at anytime can opt out by replying "STOP".
Replace your windshield as soon as next day at your home, work or your preferred location.
By submitting this form you are agreeing to receive SMS and phone call updates on your windshield replacement and at anytime can opt out by replying "STOP".
By submitting this form you are agreeing to receive SMS and phone call updates on your windshield replacement and at anytime can opt out by replying "STOP".
By submitting this form you are agreeing to receive SMS and phone call updates on your windshield replacement and at anytime can opt out by replying "STOP".
How to Fix a Cracked Car Window.
A cracked car window is more than just a cosmetic issue—it can pose serious safety risks and lead to larger problems if not addressed quickly. To fix a cracked car window, the first step is to evaluate the severity of the damage. Small chips and cracks, particularly those not in the driver’s line of sight, can often be repaired with a resin-based glass repair kit. These kits are available at most auto parts stores and come with detailed instructions. Begin by cleaning the cracked area thoroughly and drying it completely. Then apply the resin into the crack using the applicator tool, and let it cure under UV light or natural sunlight. Once hardened, scrape off any excess resin and polish the surface for a clearer finish. If the crack is longer than three inches or located along the edge of the window, a full replacement is usually the safest solution. Larger cracks may compromise the structural integrity of the glass and the vehicle itself. In such cases, it's best to consult a professional technician to determine whether repair or replacement is most appropriate. Acting quickly prevents further spreading, keeps the window sealed against weather, and preserves overall vehicle safety.
How to Fix a Crack on Windshield.
Windshield cracks can happen suddenly and often start as small chips that expand over time due to temperature changes, pressure, or driving vibrations. To fix a crack on your windshield, begin by determining the length, depth, and location of the damage. Cracks shorter than three inches can usually be fixed with a windshield repair kit, which typically includes a resin applicator and curing strips. Clean the area thoroughly and follow the kit instructions to inject resin into the crack, then let it cure properly. This helps stop the crack from spreading and improves the glass's appearance. However, cracks that are deep, long, or in the driver's line of sight often require professional evaluation and may necessitate full windshield replacement. Replacing a windshield restores both visibility and structural safety. Many auto shops offer mobile repair services for added convenience. Additionally, if your vehicle has ADAS features like lane departure warning or forward-collision detection, post-repair calibration may be necessary. Don’t ignore a cracked windshield—fixing it early can save money and preserve your car’s integrity.
How to Fix Car Window That Won’t Go Up.
When a car window won’t go up, it can be both inconvenient and a potential security issue. The first step in fixing a car window that won’t go up is identifying the source of the problem. Begin by checking the fuse box—if the power window fuse is blown, replacing it may immediately restore function. If the fuse is intact, the issue could lie with the switch, motor, or window regulator. Try operating the window using the master switch on the driver's door and the switch on the affected door. If neither works, the window motor may be dead. Remove the interior door panel carefully and inspect the wiring and connections. Use a multimeter to test if power is reaching the motor when the switch is activated. If the motor is getting power but not moving, it likely needs to be replaced. If the window is off-track, the regulator may be damaged or misaligned and should also be replaced. If you're uncomfortable with electrical diagnostics or mechanical repairs, take the car to a certified technician for proper diagnosis and repair.
How to Fix Bubbled Window Tint.
Bubbled window tint not only looks unattractive but also affects visibility and window performance. Bubbles typically form due to improper installation, trapped air, or moisture beneath the film. If you're dealing with bubbled window tint, start by identifying whether the bubbles are air or water-based. For small air bubbles, use a heat gun or hairdryer to warm the tint—this softens the adhesive and makes the film more pliable. Using a soft cloth or squeegee, gently press the bubble toward the edge of the window to release the air. If the tint film is old or the adhesive has degraded, the bubble may not go away and the tint may need to be replaced. For larger or persistent bubbles, it’s usually best to remove the tint and install new film. To remove tint, apply heat evenly and peel the film from one corner. Clean off any adhesive residue with a tint-safe adhesive remover or rubbing alcohol. Once the glass is clean, you can reapply a fresh film. If you're unsure about handling the process yourself, a professional installer can ensure a flawless, long-lasting tint job.
How to Fix a Squeaky Car Window.
A squeaky car window can be both annoying and an early sign of wear in the window track or regulator system. The most common cause of squeaking is dirt, debris, or lack of lubrication inside the window tracks. Start by rolling the window up and down to pinpoint the noise. Then clean the window channels with a microfiber cloth or a soft-bristled brush to remove any dirt and grime. Once clean, apply a silicone-based spray lubricant along the tracks. Avoid using grease or petroleum-based lubricants, as they can attract dirt and create sticky residue. Roll the window up and down several times to distribute the lubricant evenly. If the squeaking persists, remove the door panel to check for issues with the regulator, track alignment, or worn weather stripping. A misaligned window or damaged regulator may cause continuous friction and require adjustment or replacement. Keeping your window channels clean and lubricated ensures smoother operation and reduces wear on internal components.
How to Fix Car Power Window.
A malfunctioning car power window can be both inconvenient and frustrating, especially when the window won’t open or close properly. If you’re trying to fix a car power window, the first step is to determine what component is causing the problem. Begin by checking the fuse that controls the power window circuit—if it’s blown, replacing it may restore functionality. If the fuse is fine, the issue could lie with the switch, motor, or regulator. Try using both the master switch on the driver’s side and the switch on the individual door to see if either works. If neither activates the window, it’s likely an issue with the window motor or internal wiring. To investigate further, remove the interior door panel carefully to access the motor and regulator. Use a multimeter to test whether electricity is reaching the motor when the switch is pressed. If there’s power but no movement, the motor is likely faulty and will need to be replaced. If the motor works but the window doesn’t move properly, the regulator could be jammed, off-track, or broken. Replacing these parts usually requires basic tools and moderate DIY skill, but if you're unsure, a professional technician can quickly diagnose and repair the system. Prompt attention helps avoid further electrical strain and ensures the safety and security of your vehicle.
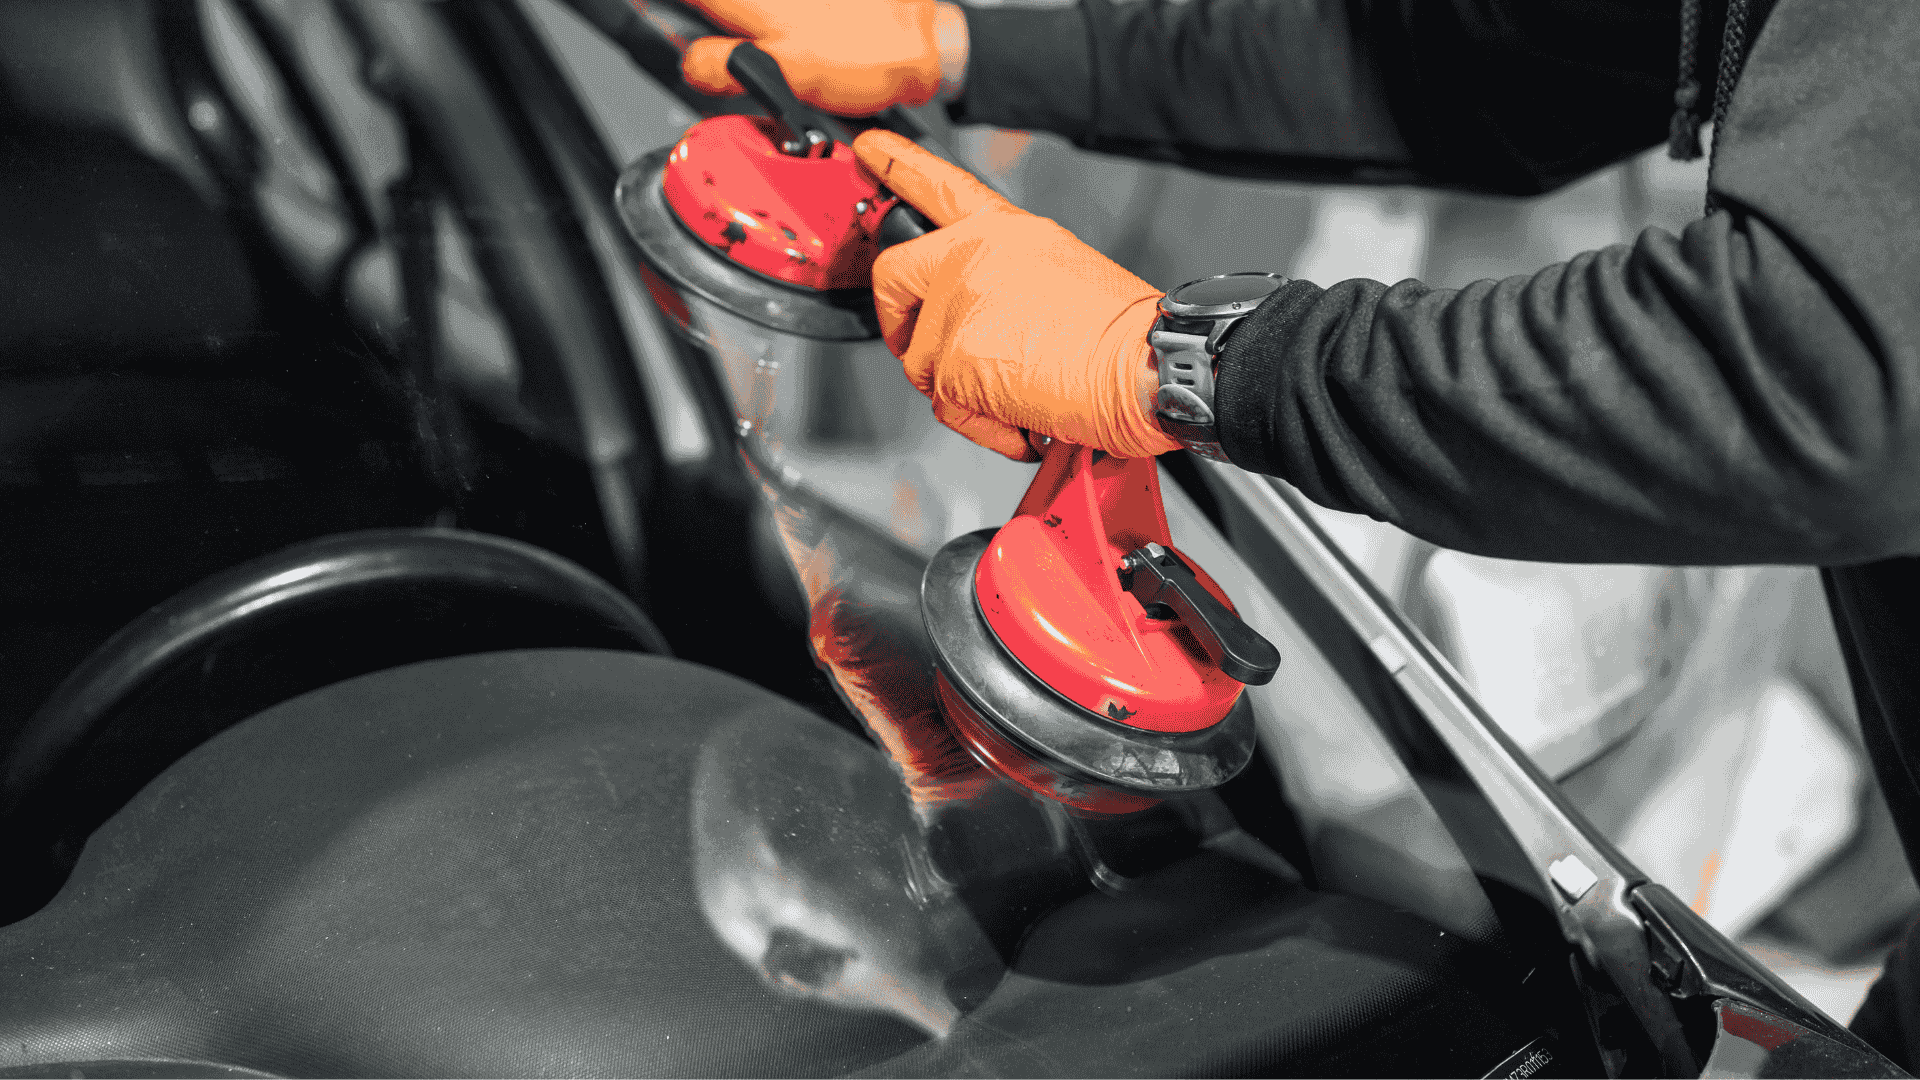
How to Fix Cracked Car Glass.
Cracked car glass can compromise the safety, appearance, and structural integrity of your vehicle. Whether it’s the windshield, side windows, or rear glass, prompt repair is essential to prevent the crack from spreading. Start by assessing the severity and location of the damage. If the crack is less than three inches long and not in the driver’s line of sight, you may be able to fix it yourself using a resin-based glass repair kit. Clean the area thoroughly and apply the resin as directed. Let it cure under UV light or sunlight, then scrape away any excess and polish the area. For longer cracks or those near the edge of the glass, replacement is typically recommended. Structural cracks can weaken the overall integrity of the vehicle’s frame and put occupants at risk in the event of a collision. If the cracked glass has features such as tint, heating elements, or antennas, it's best to leave the job to a professional to ensure everything is reinstalled correctly. Don’t delay—acting quickly to repair cracked glass prevents further damage, avoids legal issues related to obstructed views, and keeps your car in top condition.
How to Fix Scratches on Car Window.
Scratches on car windows not only affect the aesthetics of your vehicle but can also reduce visibility, especially when light hits at certain angles. To fix scratches on a car window, begin by cleaning the glass thoroughly to remove dirt and prevent further scratching during the repair process. Use a non-ammonia glass cleaner and a microfiber cloth for best results. Once the surface is clean and dry, apply a glass polishing compound—often containing cerium oxide—directly onto the scratched area. Using a microfiber cloth or polishing pad, buff the scratch in a circular motion with gentle, consistent pressure. Continue polishing until the scratch becomes less visible or disappears entirely. Wipe the area clean and check your progress. For deeper scratches that catch your fingernail or are visible from both sides of the glass, polishing may not be sufficient. These will require professional attention, and in some cases, window replacement may be necessary. Prevent future scratches by avoiding dry wiping, keeping windows clean, and replacing old or torn wiper blades that may drag debris across the glass. Regular maintenance ensures your windows stay clear and improves your overall driving experience.
How to Fix Windshield Pitting.
Windshield pitting is caused by small, repeated impacts from sand, debris, and road particles, leading to tiny indentations on the glass surface. Over time, this wear can scatter light, create glare, and reduce visibility, especially when driving at night or into the sun. Unfortunately, pitting cannot be fully repaired like a chip or a crack, but there are ways to improve visibility and delay the need for replacement. Begin by cleaning the windshield thoroughly using automotive glass cleaner and a microfiber cloth. Next, apply a glass polishing kit that includes cerium oxide or another fine abrasive compound. Buff the windshield in overlapping circular motions, focusing on the pitted areas. This won’t remove deep pits but can smooth the surface slightly and reduce light distortion. If the pitting is extensive, particularly in the driver's line of sight, replacing the windshield may be the only way to restore full visibility and safety. Prevent pitting by maintaining a safe distance from trucks and vehicles that kick up debris, replacing worn wiper blades regularly, and applying hydrophobic coatings that repel dirt and water. Proactive care extends windshield life and improves your overall safety on the road.
How to Fix Squeaky Windshield Wipers.
Squeaky windshield wipers can be distracting and annoying, especially during wet conditions when you rely on them most. The squeaking noise is usually caused by dirt buildup, worn-out wiper blades, or friction between the blade and the glass. To fix squeaky windshield wipers, start by cleaning the windshield thoroughly with a quality automotive glass cleaner. Then, lift the wiper blades and clean the rubber edge using a cloth soaked in warm soapy water or rubbing alcohol. This removes dirt and oil that can cause skipping or squeaking. Inspect the blades for cracks or stiffness—if the rubber is brittle or uneven, replace the blades entirely. Ensure the wiper arms are not bent or misaligned, as this can affect blade contact with the glass. If the squeaking persists, consider applying a silicone-based lubricant to the rubber edge of the blade to reduce friction. Avoid petroleum-based products that can damage the rubber. Also, make sure the windshield is free of wax or residue that could cause drag. Regular maintenance and blade replacement every six months help prevent noise and ensure clear, streak-free visibility in all weather.

